Sunday, September 16, 2012

Microwave Kettle Corn

Hello everyone! I hope you all had a great weekend full of fun and exciting adventures! My weekend was kind of hectic and crazy, so tonight I wanted a really simple, but oh-so delicious snack and what I was really craving was popcorn. Not just any popcorn though, I wanted the King of all popcorn; I wanted kettle corn. So I turned to Pinterest for advice on how to make this delectable snack quickly and easily and, of course, Pinterest did not fail me!

I found a great and simple recipe for it and I guarantee you have most of the ingredients in your house right now except for the popcorn kernels (but I had them so who knows, you might have them too!). All it calls for is popcorn kernels, sugar, salt, vegetable oil, and a brown paper bag that you would pack lunches in. Simple, huh? So, without further ado, I give you a simple and easy snack to make sometime this week! Enjoy!


Microwave Kettle Corn

Website: http://www.food.com/recipe/kettle-corn-microwave-301472

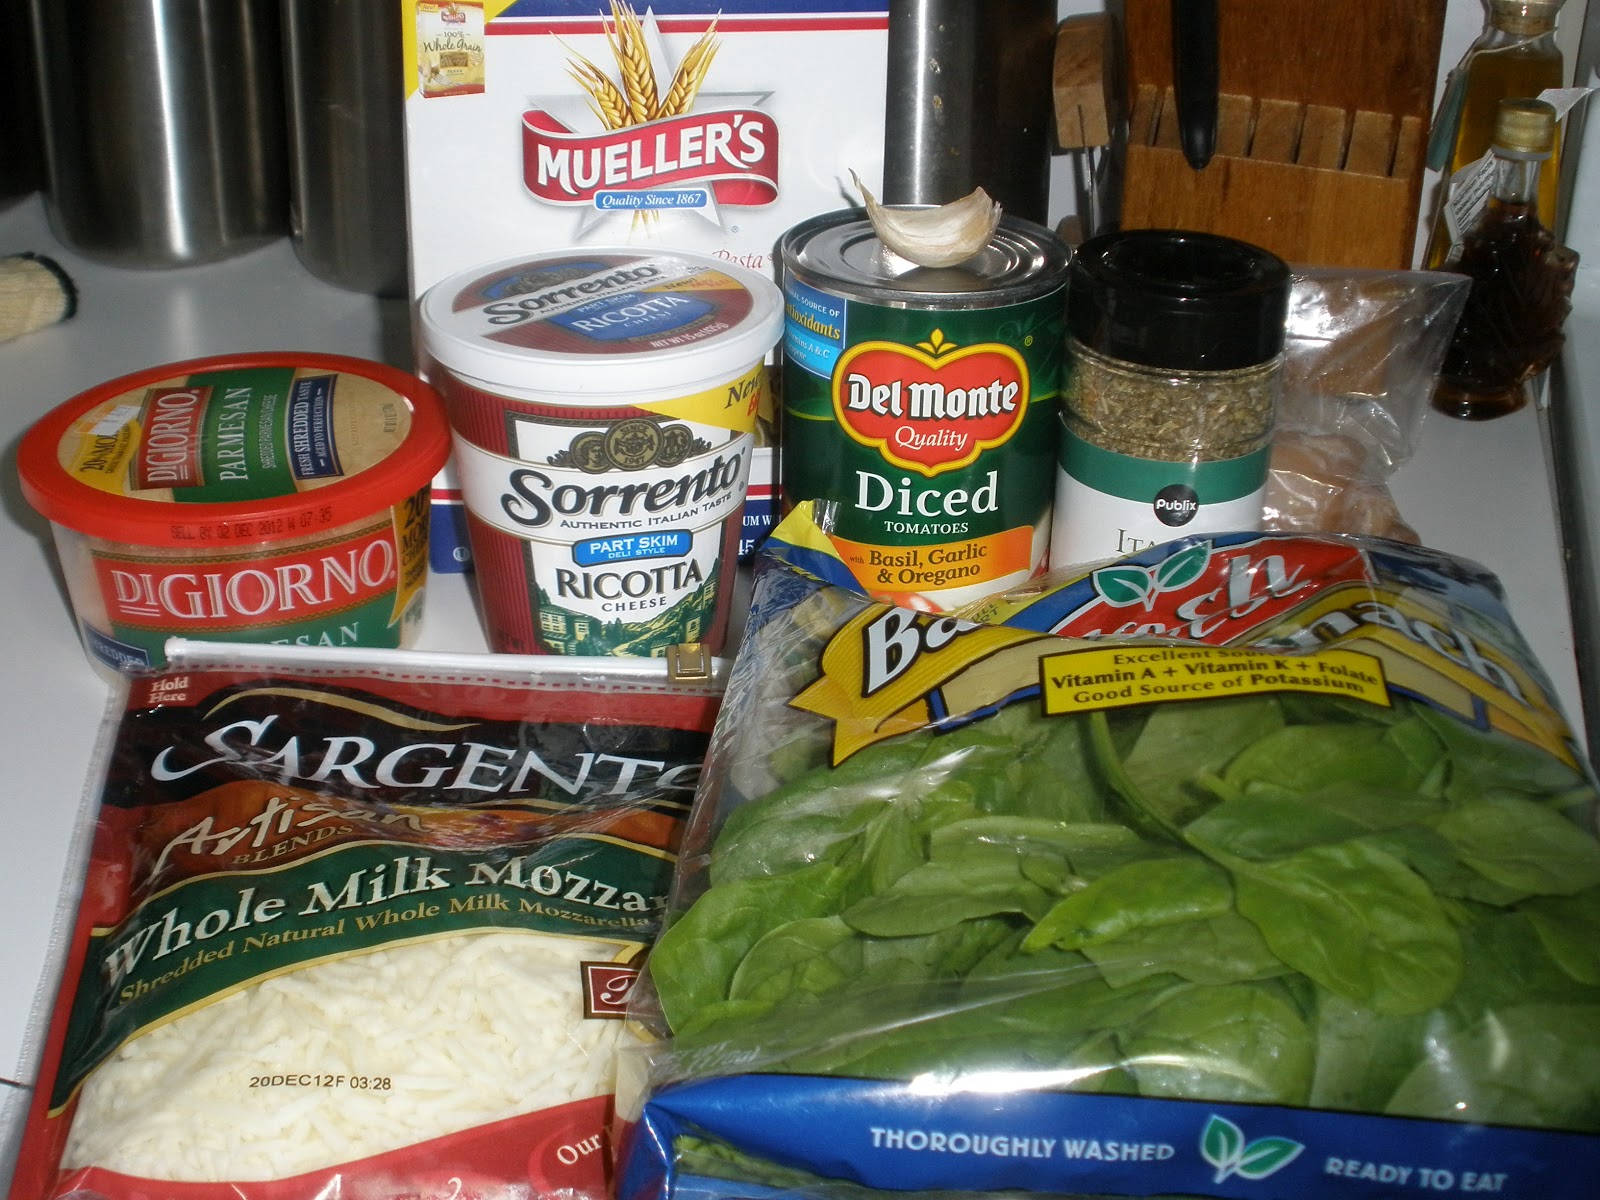
The first thing you'll want to do is get all of your ingredients together (mise en place!!)


You mix all of your ingredients in a bowl first so that your popcorn gets evenly coated with all of the ingredients.


Popcorn kernels with sugar and salt added

This is after the vegetable oil was added. Make sure to coat all kernels well.

When you're done coating your kernels, pour them into your brown paper bag (and make sure you scrape all the sugar/salt mixture from the bowl and put that into the bag. When you're done, you'll want to fold the paper bag over a couple of times. The recipe said to staple it, but I don't like the idea of putting metal staples into my microwave, so I just folded it really well. I also put my bag onto a microwavable plate because I had a sneaking suspicion that the oil was going to seep through the bag.


As you can see, my suspicions were correct (I should be a detective!)

I microwaved mine for about two minutes; you might need more or less depending on your microwave. Just know that this popcorn has a tendency to burn! Even at about the two minute mark, I could smell a little bit of burning. Just keep an eye (and an ear) on your popcorn to make sure it doesn't burn! Also, be extremely careful when taking your plate out of the microwave. Mine got really hot from the oil and I hurt my hand a bit, so keep that in mind when you're taking yours out.

Here is the yummy popcorn!

The popcorn was really simple to make (it probably took me two minutes to prepare) and was actually really yummy! I like this popcorn because it doesn't taste so processed like a lot of the pre-made popcorn bags do. I, personally, would add more sugar, but that's because I'm part hummingbird and basically live off of sugar haha. Also, just keep an eye on the time when you're making it so it doesn't burn. Other than that, it's really quick, easy, and cheap so I would definitely recommend it!

Thanks for coming to my blog again! I hope you enjoyed today's recipe and let me know if you try it out for yourself! Also, don't forget to subscribe to my blog to get updates when I put up new posts by clicking the subscribe button below the search bar on the right hand side of this page (if you're on a mobile device, you will have to click "view web version" at the bottom of the page, then follow the directions above!). If you ever have a Pinterest recipe that you'd like me to try, leave me a comment and I'll be sure to make it as soon as I can! I hope you all have a great week and keep checking back for my next recipe!

Friday, September 14, 2012

Meatball Bubble Biscuits

Hello everyone and I hope you all are having a fantastic Friday (hooray alliterations!). I got a request a couple of days ago to make a recipe called Meatball Bubble Biscuits. At first, I was really excited and I couldn't wait to make them and then I thought, "Wait, I don't really care for meatballs..." Oh well, I decided to just bite the bullet and go through with it because these looked pretty darn tasty!

Now let me just say right now, to see if I would like these a little bit better, my roommate made homemade meatballs and that did help! We also used our homemade marinara sauce that we had left over from a few days ago and that was also very tasty! But if you're short on time and tired from work or kids and want to use frozen meatballs and sauce from a jar, I totally get that! I would too if my roommate didn't offer to make me some amazing food! ;)


Meatball Bubble Biscuits

Website: http://kathiecooks.blogspot.com/2010/08/meatball-bubble-biscuits.html

So now, without further ado, we shall begin our Meatball Bubble Biscuits!

First of all, these are my roommate's homemade meatballs. She fried them up a bit and then set them off to the side to cool.


So here are your biscuits. You need to separate them into halves. The lady who made these didn't say to keep the two halves attached, but I found it a lot easier to fold them up if the halves were connected. Also, just know that the biscuits are pretty tough to separate by hand; you just have to be kind of gentle with them (which is not really my forte).


Here are the biscuits separated into halves. Notice that the halves are, indeed, connected

Next, cut your meatballs in half

Cut the string cheese into pieces (I cut mine into 6 pieces).


As we did with the peanut butter and jelly muffins, I made a small groove in the middle of the biscuit. This allows all of your ingredients to lay better. It's hard to tell in the picture, but just make a small indent about two thumb-widths wide. 

I put my string cheese piece into the groove

Then, I put my meatball half on top of the piece of cheese
This is the part where keeping your biscuit halves connected comes in handy! You are now going to fold your edges together. Make sure to do it tight so that your cheese doesn't gush out the side. I kind of folded the top part of the biscuit over the bottom half and then laid the biscuit seam side down. It should look a little something like this:

A little lumpy ball of deliciousness


I also decided to try a meatless version since I realize not everyone likes meatballs (myself included) so I put pasta into the biscuit. I put on the seasoning for the top of the biscuits and when all my biscuits were done, I sprayed a 9" baking pan with Pam cooking spray (don't forget this or you will be kicking yourself later!!!) and put the pan into the oven.

Pre-seasoning
Pot-seasoning. I was tempted to eat them just like this, haha.


Once they're done cooking, they should look a little something like this! Yummy yum! I served these with some pasta because these biscuits didn't seem too filling (and they weren't!).


Well, let me just say that these biscuits were kind of weird. Not bad, just...weird. They were kind of dry, but I don't think you could put sauce inside the biscuit because that would probably make them soggy when they're baking.

My other problem with these is that it tasted a little weird with the biscuits. The biscuits gave it a little bit of an artificial butter taste which doesn't really fit the whole motif. So, what I was thinking was that it might taste better in some pizza dough! If your grocery store doesn't carry fresh pizza dough, Pillsbury has packaged pizza dough that you could use. I think that would definitely taste much better!! :)

I hope you all found this helpful and let me know how it goes if you make these! Don't forget to keep coming back for more reviews of Pinterest recipes! Also, don't forget to subscribe to my blog to get updates when I put up new posts by clicking the subscribe button below the search bar on the right hand side of this page (if you're on a mobile device, you will have to click "view web version" at the bottom of the page, then follow the directions above!). If you ever have a Pinterest recipe that you'd like me to try, leave me a comment and I'll be sure to make it as soon as I can! I hope you all have a great weekend and stay tuned for my next recipe!

Thursday, September 13, 2012

Peanut Butter and Jelly Muffins

Hello everyone! I hope your week is going well! Hopefully some of you tried the Chicken and Spinach Penne from the other day. Today's recipe was chosen by my lovely friend Beka.

So, today we will be making peanut butter and jelly muffins (sounds yummy, right?). When she told me she wanted to make these, I liked the idea of them: they're a good breakfast food because they have protein (from the peanut butter) and they're easy to grab and go if you're in a rush.

This recipe says you should use grape jelly, but we thought to ourselves "Why stop there??" So we ended up getting 6 different kinds of jelly (we might have overdone it just a bit). So, we got all of our ingredients together and got started!


Peanut Butter and Jelly Muffins

Website: http://eatathomecooks.com/2009/10/peanut-butter-and-jelly-muffins.html

This recipe was fun, but there were also a lot of flaws which I found vary annoying. First, she gives you a measurement for your milk, and not until after you add everything and mix it up does she tell you "Oh, by the way, you might need more milk here." Second, she's right. More milk is needed because the batter is really dry which makes it kind of icky, so plan on adding an extra tablespoon or so of milk. And third, putting the jelly into the batter is a messy affair, but never fear! I have a solution for you (as always)!

I told you we went a little crazy with the jelly...

Mix up all of your dry ingredients
Then, separately, mix all of your wet ingredients (go slow at first because it will slosh!)

And it should look a little something like this when you're done


The original website didn't say to do this, but when you're mixing wet and dry ingredients, it's always important to make a well in the dry ingredients first (as shown in the above picture). This allows you to mix the ingredients together better :)

Now pour your wet mixture into the dry mixture and stir it up!

It should look a little something like this (this is with that extra addition of milk)


Since we had so many jelly flavors, we color-coded our muffins with different colored muffin papers. I also sprayed the muffin papers with Pam baking spray because I hate when you have a muffin and half of it gets lost because it sticks to the muffin paper (not fun!).

This is how we kept our muffin flavors straight, haha


When we first started making these, we were just kind of haphazardly putting jelly on top of the first scoop of batter, but I soon realized that this wouldn't be good. I mean, you could do it like that, but then your muffin would be a lot messier because jelly would be gushing out the side.So, I decided that we needed to make a little groove in the peanut butter batter by making a thumbprint. That helped keep the jelly in place a lot better!


Here's what they looked like with the jelly (don't mind how messy they are)
Next, you put your top layer of batter on and prepare to bake!! :)

And here's what they should look like when you're done!

Ta-daaa!!!!! :D

This is the apple jelly muffin

This is the blackberry jelly muffin
All in all, I really enjoyed these muffins. I would definitely suggest putting a groove in your batter to allow the jelly to have a place to sit and, of course, don't forget that extra splash of milk that you need. We really enjoyed these muffins, though, and I would definitely make them again! They're easy to carry and take with you if you're in a rush. In fact, I took one with me this morning for school!

Now, I know you're probably wondering which jelly flavor tasted the best, right? Well, they were all good, but I really liked the blackberry and the raspberry. Beka said she really liked the grape and the strawberry. Long story short, pick whatever flavor you like best and roll with it :)

Thanks again for stopping in to read my blog and don't forget to subscribe to this blog for updates on my new posts! The subscribe button is on the right hand side of this page below the search bar. Come back soon to see a new Pinterest recipe that I review! Also, if you have a recipe that you'd like me to try, feel free to give me the website in the comments. Happy Thursday everyone!

Monday, September 10, 2012

Three Cheese Chicken Penne Pasta Bake

Hello everyone! I hope you all had a better weekend than I did (I was stuck inside studying all weekend. Boo!). While I was taking a break from studying, I decided to make dinner and what I decided on was this delicious recipe! It just sounded so yummy that I HAD to make it! The only problem I had was finding a particular kind of cheese that this recipe uses called Neufchatel cheese. So, since I couldn't find it, I decided that ricotta cheese was a good substitution. And for those of you who are trying to eat healthy, ricotta is actually lower calories than Neufchatel cheese. So, I got all of my ingredients together and got started!


Three Cheese Chicken Penne Pasta Bake

Website: http://www.the-girl-who-ate-everything.com/2010/08/healthy-three-cheese-penne-pasta-bake.html

The best way to save money on this recipe is to buy your food when your grocery store is having a sale or use coupons. We bought our chicken in bulk and froze the majority of it; that way, when we're making a dish, we can just thaw the chicken and we're ready to go! My grocery store has regular sales on pasta, so keep your eyes out for those deals too!


This recipe said to use fresh basil when you cook the chicken, but I didn't have any on hand (and frankly, I think fresh basil is a bit strong), so I used Italian Seasoning mix instead. 

The recipe said to use pre-made sauce in a jar, but my roommate makes amazing sauce, so she made some up and we used that! :) Feel free to make your own sauce if you feel up to it!

Addition of diced tomatoes to the chicken


Addition of sauce to the chicken and tomato mixture


I like this recipe because it saves you time by letting you cook two different things together so you don't dirty up more pots than you need. So, when you cook the pasta, once it is done you add your spinach leaves into the pot and let them cook for a minute or two. 


The spinach cooks really fast, so make sure to keep an eye on it!


This is the addition of the ricotta to the sauce and chicken mixture. I might have added a little bit more than the recipe called for....ok, maybe it was a lot more ;)

This is what it looks like after you add the ricotta cheese

Then you mix all of your yummly ingredients together...so delicious!


Transfer your pasta mixture into a casserole dish, but before you do make sure you spray the dish with non-stick cooking spray! I forgot to and it was very difficult to scrub the dish afterwards (I had to soak it forever!).


Pop it in the oven for about 20 minutes and sit back and relax. After 20 minutes, you'll take your dish out and top it with mozzarella cheese. It should look like this delicious mixture right here:


Transfer your serving onto a dish and serve with a niece piece of bread with butter!


Hard to resist...

I absolutely loved this recipe!! Mostly because it was so delicious, but also because it was really easy to whip together! If you can find Neufchatel cheese, then you should try it, but it was really yummy with the ricotta cheese! I would definitely recommend this recipe for anyone to try and I know that I'll be making it again in the near future :)

Thank again for stopping by and reading my blog! Don't forget to subscribe to my blog so you can be updated whenever I put up a new post (the button is on the right hand side below the search bar). Come back soon for my next review of a Pinterest recipe and don't forget to leave a comment if there's a recipe you want me to try! See you all soon!