Friday, August 31, 2012

Heroin Chicken

For today's recipe, we will be making Heroin Chicken! This recipe was suggested by one of my readers and it sounded so delicious, I couldn't wait to make it! Let me just tell you, this recipe is not for those who are dieting because a main part of it calls for a large (and I mean large!) heap of butter. Like I've said previously, the biggest way to save money when you're making a meat dish is to look for sales on meat in your local grocery store or use coupons. When chicken went on super sale a couple weeks ago, we stocked up and bought about 6 packages of chicken. We froze the packages so whenever we want to make a chicken dish, we just pull one out the night before and voila! Super easy. So, without further ado, let's begin!


Heroin Chicken

Website: http://www.food.com/recipe/heroin-chicken-371704

First of all, this chicken sounds amazing! I love butter ( a LOT!) and I especially love when things are smothered in butter, as this chicken is. So, the first thing I did was get all of our ingredients together.

Once I did this, I got to work. I put the butter into a microwaveable bowl and put it in for about two minutes (note that I didn't even use all of the butter I was supposed to and there was still so much!). I realized that there was more butter than we needed, so I split it up and saved one half of it for another secret project which I will disclose later in this post...


Once the butter was all melted, I mixed together the dry ingredients which would form the "crust" for our chicken. 


 As I mixed these ingredients with my hands (like a true chef!), I realized there was waaaay too much than what we needed for four chicken breasts. So, once again, I divided up the mix and saved one half for that secret project I mentioned earlier (you probably forgot about that, huh?).

Now, the recipe didn't say this, but I sprayed my aluminum foil with Pam, simply because I have had bad experiences with chicken sticking to the foil (it's not fun). I would suggest doing this because it made the chicken really easy to get off once it was cooked.

 Now comes the fun part!Instead of using an egg mixture to dip your chicken in so the seasoning will stick to it, you use that delicious melted butter that we made earlier! How great is that?? So, you dip your chicken in the butter, coat it generously in the seasoning mix, and it should come out looking like this:


Once that was done, we popped the chicken in the oven for 30 minutes. My chicken breasts were pretty thin, so I chose to cook them for a lower amount of time. I would suggest cooking them for 30 minutes, then checking them with a meat thermometer to see if they're ready.

While those were cooking, I decided to test my secret recipe idea which is......Garlic bread with Parmesan cheese and herb mixture topping! Not really a catchy name but hey, we can't win 'em all. So the first thing I did was grab a few slices of Italian bread. We luckily had Italian bread in the house, but if you don't no worries, I'm sure this recipe would taste good on any kind of bread (or bread-like substance).


Then I grabbed that butter mixture that we set aside earlier. You could add real garlic to the butter, but to save time we used garlic salt.

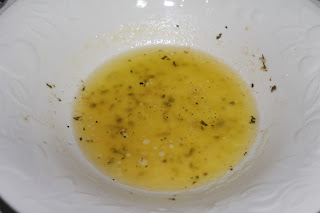
It just makes you want to drink it, doesn't it?
Now it's time to brush your bread with the heavenly garlic butter mixture. I used a brush that's normally for putting marinade onto meat, but it works just as well with delicious butter.

 
 Sprinkle some of the seasoning mix onto your buttered bread (and make sure it's spread evenly) and put it in the toaster oven. I baked mine at 350 degrees for about 7-8 minutes. If you don't have a toaster oven, don't worry! Just pop it in with your chicken that's already cooking in the oven! Let me tell you right now, the smell of that garlic bread cooking will drive you crazy! It smells so amazing that you're not gonna want to wait 7 minutes!

Luckily, the force was strong with us today and our willpower was stronger than our urges, so our bread cooked and it was fantastic! Here's a picture of our first batch:

Like heaven on a plate

Soon after the bread was done, the timer for the chicken went off. I checked the chicken with a meat thermometer and it was well over what it should be (165 degrees Fahrenheit). So, using my nifty "Ove Glove" which has now stopped resisting heat so well after many years of use, I took the chicken out of the oven and savored the moment, thinking about how awesome it would be when I could finally eat this in a few minutes!

Look at all that extra butter at the bottom!
 
The finished product! I served the chicken with garlic bread, white rice, and steamed carrots

All in all, this meal was very easy to make as long as you don't mind getting your hands a bit dirty (that's half the fun!). It took me about ten minutes to prepare this dish which is nice if you need to make a meal fast. My only problem with this recipe is that the seasoning you put on the chicken is good, but very overpowering!  I think that there might be too much oregano and Parmesan cheese in the mixture; if I made this recipe again, I would only put 1 tablespoon of dried oregano in or I would put in 2 tablespoons of fresh oregano. I would also half the amount of Parmesan cheese I used (so, 1 cup instead of 2 cups).

Also, I think there was too much excess seasoning mixture. I covered 4 pieces of chicken, 5 pieces of bread, and I still had a large amount left over! If you're doing a small amount of chicken like I did, I would cut the recipe in half. Besides that, I think this dish is really good! I would definitely make it again, but just with a few changes that I mentioned above :)

I hope this helped and I hope that your chicken comes out great if you make it! Once again, thanks for reading my blog! If you like what you see, please subscribe to my blog via Google+ or email (the links are on the side of the page below the search bar). Check back every day for more Pinterest recipes that may or may not make the cut! I hope you all have a great Labor Day weekend!

Also, thanks again to my friend Heather for taking such awesome pictures!


Time to drink!! Alien Brain Hemorrhage!


Hey everyone! It's time for another post about some awesome Pinterest recipe that you can make! Since I did three recipes yesterday, but didn't do a cocktail (scandalous, I know), I decided that I should do one tonight!

As I was sitting in my Molecular and Cellular biology class today, my teacher went off on a tangent and my brain went on overload. The information wasn't hard to understand, but it was just a lot all at once. While I was trying to process everything he was saying, I felt like my brain was hemorrhaging, and then it hit me! Why not make an alien brain hemorrhage!!

You heard me right, an alien brain hemorrhage. If you haven't heard of this drink it's pretty cool and it looks so wicked! As I look at this drink more and more, I think that it would be perfect for a Halloween party, if you still want to make it (keep reading for full details).

alien brain hemorrhage cocktail
This is how the drink is supposed to look

 So, you can't drink by yourself (well, you can, but they have meetings for people like that) so I invited over a couple of my friends, Beka and Heather. Heather takes amazing pictures, so she offered to do the pictures for tonight's blog (woohoo!). So let's get started.


Alien Brain Hemorrhage

Website: http://latinrapper.com/blogs/?p=1893

I love this drink for two reasons: the name is really funny and the drink looks simply amazing! What's supposed to happen is the peach schnapps goes in first, then the Bailey's goes in and magically floats on top of the schnapps (hooray science!). Next comes the Blue Curacao which chills out under the Bailey's. Then the grenadine comes in to ruin everyone's day. It's like "Oh, you wanna be segregated into nice little layers? Nope!" And then BAM! Hemorrhage!!

The drink was pretty quick to whip up; the only bad part was, of course, alcohol isn't really cheap. My best advice is to use alcohol you already have or buy a cheaper version of what you need. It seemed a little complicated but I thought, "Eh, I'm sure I can do it." So, we gathered all of our ingredients and got to work! 
 

We added the Baileys and, let's just say, things didn't go as planned...


Not quite like the picture...

 So, our version didn't turn out quite like the picture, but it still kind of looks like a brain hemorrhage. As was pointed out by my roommate, our method was what led to our downfall. We were pouring the liquid right into the center of the glass. The trick to making this shot (and getting the alcohol to separate into layers) is to pour the Bailey's and the Blue Curacao down the side of the shot glass (you can pour the grenadine and peach schnapps into the center of the glass). I posted a video of the proper pouring technique for this shot :) Since we're not ones to give up, we put the failure aside and tried again!  Luckily, this one went a little better.


This is starting to look promising...


Now that's what I'm talkin' about! This is what you want it to look like! Ooey, gooey, and totally insane!


 After we reveled over our amazing creation, we made another, toasted, and tasted our beautiful concoction. Let's just say, this drink was one of the most disgusting things I've ever had. The taste itself wasn't bad (it was actually pretty nice), but the texture was so awful that you couldn't even enjoy the drink. It was like drinking a glass full of calloused skin and boogers. This drink is fun to make, fun to look at, but not fun to drink! If you want my advice, stay away from this shot!!!

Don't forget, post some recipes you'd like me to try and I'll make sure to get to it! The recipe for tomorrow is "Heroin Chicken" which was requested by a reader of this blog. Stay posted for the results of this chicken which has been popping up all over Pinterest!

Here's a link to the video we made to show you the best way to pour your alien brain hemorrhage shot (if you still decide to make one). It's narrated (mostly) by Heather and hopefully it will help your shot look pretty cool!

http://www.youtube.com/watch?v=jjb27aE9CJI&list=FL-iFsy09EzS3LcgbMQ_n04A&feature=mh_lolz

Wednesday, August 29, 2012

Welcome to my blog!

Hey everyone! My name's Alyssa and this will be your (hopefully) comprehensive guide to making some of those delicious recipes we all see and crave on Pinterest. So many of us love Pinterest, but some of the recipes are really time-consuming and can cost quite a bit of money with their odd assortment of ingredients. Being as I am in college, my time and money are precious and it's great when I can cut corners on either of those (without negatively impacting my food).

So, throughout this blog I will post recipes that I have tried and let you, the readers, know how easy it was and how it tastes (which is the most important part, haha!). I will post tips with each recipe that I think might help. These tips might be anything from recipe modifications, ways to save time on preparation, ways to save money, or a tip to just never make this recipe!! If any of you see a recipe that you'd like me to try, post it and I'll give it a shot!

As most of you know, college kids love to drink, so I will also be showing you some fun cocktails you can make at home! I love all the funky drinks that are pinned all over Pinterest, but some of them just look too good to be true. I'll be your "guinea pig" and let you know the best way to serve up some of these amazing cocktails. 

I will also periodically post some cool and/or nerdy things I find on Pinterest. I'll try to link it to the food I make, but no promises. Also, I work with sea turtles, so I'm sure there will be plenty of pictures or posts about them, haha.

So, to kick off this blog, it seems right that it should start off with turtles. So, before I show the recipes I'll be reviewing today, here's a couple of the little sea turtle hatchlings I work with at my job:


I absolutely love sea turtles, so if anyone ever has questions or comments about them, feel free to message me! :)

Ok, so down to business. I figured since this is my first post, I'd start it off big and do three (that's right, THREE) recipes! I decided to do an entree, a drink, and a dessert. The entree I chose is a Brown Sugar and Balsamic Glazed Pork. I saw this pinned a while ago and have been wanting to make it ever since! For the drink, I decided on a sweet tea recipe I saw. I was going to post a cocktail recipe, but I decided I really wanted sweet tea! (and there's no one stopping you from adding a little vodka to your sweet tea, haha). Finally, for the dessert, I chose Nutella Ice Pops. The entree sounded a little heavy, so I thought the popsicles might offset them a bit. Alright, let's start!


Brown Sugar and Balsamic Glazed Pork

Website: http://www.candcmarriagefactory.com/2011/01/brown-sugar-and-balsamic-glazed-pork.html

The thing that I love best about this recipe is that it's cooked in a slow cooker! Slow cooker recipes are some of the easiest recipes because you do a little preparation, let it sit for a few hours, and then you have a delicious meal! I also love pork loin because, when it's cooked right, it's really juicy. The important thing about this recipe that will help you save money is to buy the pork loin when it is on sale. Our grocery store has sales on meat every once in a while and when that happens, we stock up on meat!  Also, the recipe calls for 2-lbs of meat, but I'm only cooking for two people so I bought a smaller size of meat (a little over 1-lb). The meat cooked a little faster, but was still very tender!

Can you tell I'm already excited for Halloween? haha
Sage, garlic, salt, and pepper rub for the pork loin

The oh-so delicious pork loin ready for the crock pot

This is where the magic happens
Let me just say that the 6 hours that this was cooking was complete torture because the smell in the house was so amazing!! In the last hour that the pork was cooking, I was making the glaze for the pork but it wasn't really thickening like I would have liked it to, so I added an extra tablespoon of cornstarch. With that addition, it came out thick and delicious!

I shredded the pork with two forks. The meat was so tender I barely had to do any work.
A dinner fit for a King (it's good to be the King)

So this dinner was freaking amazing!! The pork was so tender and barely even needed the glaze (but the glaze was great to enhance the flavor of the meat). I would definitely make this dish again, especially because it was so simple: put it in the crock pot and you're pretty much good!


Sweet Tea

Website: http://cravingcomfort.blogspot.com/2012/07/sweet-tea.html

I've always loved sweet tea, and this recipe sounds amazing and simple! I cut the recipe in half because it makes a gallon of tea and I'm the only one in my house who drinks sweet tea (I know, right? I live with crazy people!). I like this recipe because I had pretty much everything I needed except the tea bags, but they only cost about $2.50 for a bag of family-sized tea bags.

So, I rounded up my ingredients and got to work!

Apparently baking soda is the secret ingredient that makes the sweet tea smooth. Who knew?


Cover and wait for deliciousness to ensue


 I sort of forgot about the tea while it was steeping so it came out pretty dark, but no matter, the stronger the better! I added the sugar and cold water next, but I was still a bit skeptical about how it would taste. So, even though it was a bit warm, I took a taste and it was sooooo gooooood! Very sweet and very strong, just how I like it!

 So there you have it, a fast and easy way to make sweet tea which tastes so amazing! Making this only cost me the price of the tea bags because I had everything else and I only used 4 tea bags out of a box of 24. This means that I can now make 5 more jugs of this tea (mwahaha!). So if you're in the mood for some southern comfort (not of the whiskey variety), then I would definitely recommend this recipe!


  Nutella Fudgesicles

Website: http://dailywaffle.com/2011/06/01/zoku-popsicle-maker-nutella-fudgesicles/

The last recipe that I made for today is Nutella fudgesicles (I know, I almost died too). So, for any of you who don't know, Nutella is a chocolate hazelnut spread and is so amazing that some consider it the food of the gods! Not only that, but Nutella goes well with pretty much everything. When I saw this recipe I almost fell out of my chair so I knew I just HAD to make it! Hopefully, it doesn't disappoint.
                                        
 
 First of all, this recipe calls for popsicle molds, but unless you have kids or you've been saving them since you were a kid, you probably don't own these. But don't fear! Instead of going out and buying molds, we will use a method that has been used for years and years: ice cube trays! So, what you'll need is: ice cube trays, toothpicks, and saran wrap. 

So, first of all, this recipe calls for Nutella and...Pacific hazelnut chocolate milk. So, I had no idea what the hell Pacific hazelnut chocolate milk was (and neither did the lovely employees who work at my grocery store), so I decided to just substitute it with regular chocolate milk. 

 So, I mixed together the Nutella and chocolate milk and it took me a while to whisk them together because the Nutella is so dense (not complaining!). I finally got them mixed and I poured them into the ice cube trays. The mixture filled up two trays perfectly. After you pour in this heavenly mixture, cover the trays with saran wrap really tightly. Once you've covered them, poke toothpicks through the saran wrap into each slot. 


No one's perfect, ha ha
Put saran wrap over ice cube tray really tight (I obviously got lazy)
Poke toothpicks through the saran wrap, as shown
Once you're all done, pop them in the freezer and wait a couple hours for them to harden up. As I was making all of these ice pops, I realized that these cubes could also be used in plain milk to make your very own Nutella chocolate milk! Just an idea (which I will probably try). 

The finished product


Yum! Time to enjoy!

 So, the fudgesicles came out amazing! They were really good and just the right size! I say this because they are pretty rich, so I think a full popsicle would have been a little too much. Also, a word of caution if you make these, you might want to spray the ice cube tray with something because mine got a little stuck to the edges. They were just as delicious though and luckily I have a whole tray and a half to eat! >:)

All in all, these recipes were fantastic! I can't wait to try some more and make these ones again. Don't forget, you can request recipes you'd like me to try before you give it a shot and I'll give you some tips on each one (except fish recipes, I am a marine biologist after all!)!